Digital Alarm Clock: How It Works, Why It Matters & How to Build One Yourself
In the age of smartphones and smart homes, the humble digital alarm clock may seem like a relic. But don’t be fooled—this small, powerful gadget continues to serve an essential purpose in our daily routines. Whether you’re a DIY enthusiast, an engineering student, or simply someone curious about how digital clocks work, this article will guide you through what a digital alarm clock is, why it still matters, and how you can build one on your own.
What Is a Digital Alarm Clock?
A digital alarm clock is an electronic device that displays the time using numeric digits and triggers an audible alert (alarm) at a pre-set time. Unlike analog clocks, which use rotating hands, digital clocks show the time using an LCD or LED screen.
At its core, a digital alarm clock typically includes:
-
A microcontroller or digital logic circuit
-
A timekeeping component (e.g., RTC – Real-Time Clock chip)
-
A display unit (usually 7-segment LED or LCD)
-
Input buttons for setting time and alarms
-
An output system (speaker or buzzer) to produce the alarm sound
-
Power supply (battery or AC adapter)
DIY Project: Build Your Own Digital Alarm Clock
Let’s say you want to build your own using affordable components. Here’s a typical parts list:
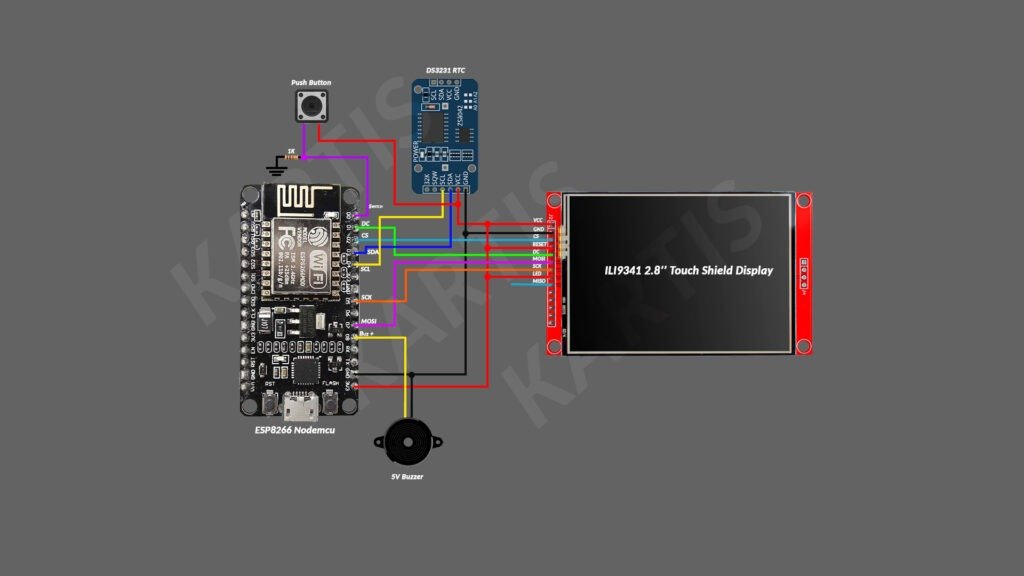
 Components Needed
-
Arduino UNO or Raspberry Pi Pico
-
DS3231 RTC module
-
ILI9341 TFT display
-
Push buttons (for setting time and alarm)
-
Buzzer or small speaker
-
Breadboard and jumper wires
-
Optional: Enclosure and USB power supply
Why Digital Alarm Clocks Still Matter
You might wonder: why not just use your smartphone? Here’s why digital alarm clocks are still relevant:
-
 Distraction-Free: Keeps you off your phone at bedtime
 -
 Power-Independent: Some run on batteries and work even during power outages
 -
 Simplicity: No apps or notifications—just time and alarm
 -
 DIY & Learning: Perfect beginner project for learning electronics and coding
How a Digital Alarm Clock Works
Here’s a simplified breakdown of how it functions:
-
 Timekeeping: An RTC module like the DS3231 keeps track of the time accurately, even if the power goes out.
 -
 Display: The time is shown using a digital display—often a 4-digit 7-segment display or an ILI9341 TFT screen.
 -
 Alarm Logic: A microcontroller (like Arduino or Raspberry Pi Pico) continuously compares the current time to the set alarm time.
 -
 Output: When the time matches, the microcontroller triggers a buzzer or speaker to sound the alarm.
 -
 User Input: Buttons or a touch interface allow the user to set or turn off the alarm.
Basic Logic
-
Initialize the RTC module and sync it to the current time.
-
Continuously read time from RTC.
-
Display time on screen.
-
Use buttons to set alarm hour and minute.
-
When current time == alarm time → trigger buzzer.
-
Allow user to stop alarm with a button.
You can find many open-source libraries (like RTClib and Adafruit_GFX) and tutorials to guide you through the code.
You can find the full source code and circuit diagram on the resources page.
-
2 people have this resource